Tuesday, April 28, 2020

This 3-Minute exercise eliminates 91% of diseases (no pills or surgery)

 
Dear Friend,
 
I’ve got a complimentary ebook for you that’s going to completely change your life!
 
If you’ve been struggling with fatigue and lack of energy…
 
Or if you have adrenal fatigue, fibromyalgia, or chronic fatigue syndrome…
 
Or even if you’re someone who’s looking to max-out the day and get a lot done…
 
Then this free energy-boosting ebook is going to be an absolute game changer for you!
 
It’s called ‘The 2pm Refresher’- Your secret weapon against afternoon fatigue!
 
The next time your energy levels hit-the-wall, simply apply these simple but highly effective energy boosting techniques – and feel not only turbocharged energy, but laser focused attention and concentration.
 
This is life-transforming training, so don’t put this off thinking you’ll come back to it later.


You’ll be so glad you did.


Kind regards,
Jezz Canuy
 
 
P.S. If Unable to Click the Link just Copy & Paste -> http://chillbai.elpaseo.trade/covid19


Sunday, April 26, 2020

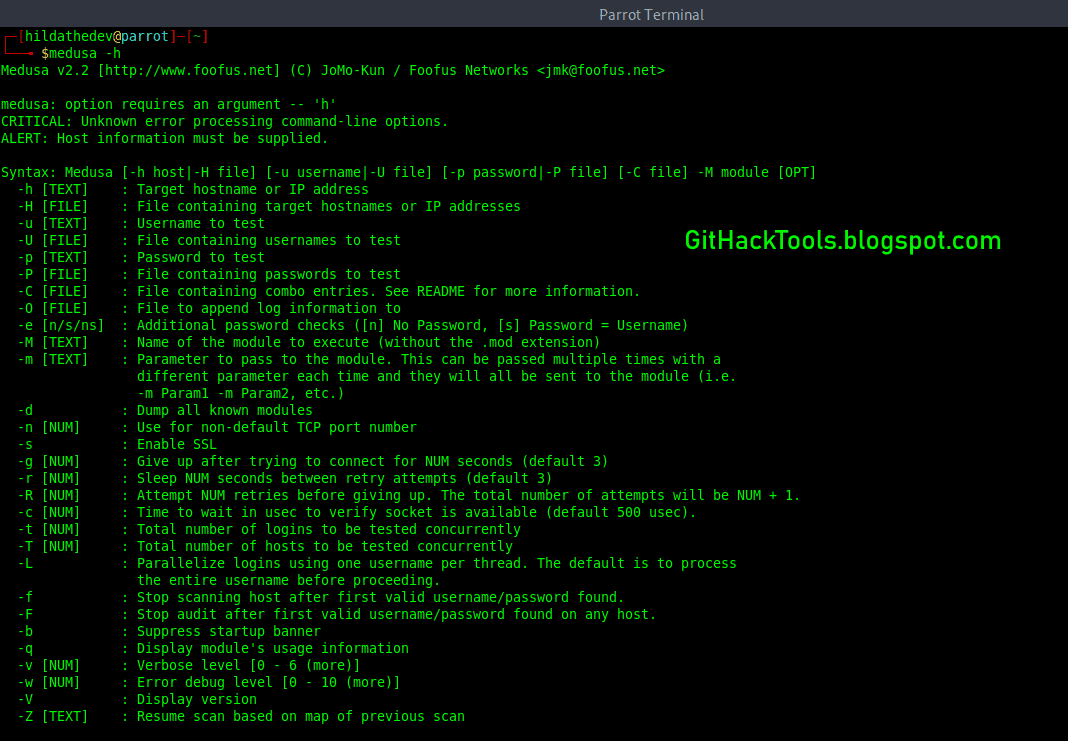
Medusa: A Speedy, Parallel And Modular Login Brute-forcing Tool


About Medusa
   Medusa is a speedy, parallel, and modular, login brute-forcer. The goal is to support as many services which allow remote authentication as possible. The author considers following items as some of the key features of this application:

   Thread-based parallel testing. Brute-force testing can be performed against multiple hosts, users or passwords concurrently.

   Flexible user input. Target information (host/user/password) can be specified in a variety of ways. For example, each item can be either a single entry or a file containing multiple entries. Additionally, a combination file format allows the user to refine their target listing.

   Modular design. Each service module exists as an independent .mod file. This means that no modifications are necessary to the core application in order to extend the supported list of services for brute-forcing.

   Multiple protocols supported. Many services are currently supported (e.g. SMB, HTTP, MS-SQL, POP3, RDP, SSHv2, among others).

   See doc/medusa.html for Medusa documentation. For additional information:

Building on macOS

#getting the source
git clone https://github.com/jmk-foofus/medusa
cd medusa

#macOS dependencies
brew install freerdp
$ export FREERDP2_CFLAGS='-I/usr/local/include'
$ export FREERDP2_LIBS='-I/usr/local/lib/freerdp'

#building
./configure
make

#executing

./src/medusa
Medusa's Installation
   Medusa is already installed on Kali Linux, Parrot Security OS, BlackArch and any other Linux distros based for security pentesting purposes.

   For Debian-based distro users, open your Terminal and enter this command:
sudo apt install medusa

   For Arch Linux-based distro users, enter this command: sudo pacman -S medusa

About the author:

You might like these similar tools:

Read more


  1. Kali Linux Hacking
  2. Como Aprender A Hackear
  3. Que Es Hacking Etico
  4. Tutoriales Hacking
  5. Computer Hacking
  6. Ethical Hacking Curso
  7. Hacking Traduccion

Linux Command Line Hackery Series: Part 2


Welcome back to Linux Command Line Hackery, yes this is Part 2 and today we are going to learn some new skills. Let's rock

Let us first recap what we did in Part 1, if you are not sure what the following commands do then you should read Part 1.

mkdir myfiles                                                # make a directory (folder) with myfiles as name
cd myfiles                                                      # navigate to myfiles folder
touch file1 file2 file3                                    # create three empty files file1file2file3
ls -l                                                                   # view contents of current directory
echo This is file1 > file1                               # write a line of text to file1
cat file1                                                           # display contents of file1
echo This is another line in file1 >> file1    # append another line of text to file1
cat file1                                                          # display the modified content of file1

Command:  cp
Syntax:        cp source1 [source2 ...] destination
Function:     cp stands for copy. cp is used to copy a file from source to destination. Some important flags are mentioned below
Flags:          -r copy directories recursively
                     -f if an existing destination file cannot be opened, remove it and try  again

Let us make a copy of file1 using the new cp command:

cp file1 file1.bak

what this command is going to do is simply copy file1 to another file named file1.bak. You can name the destination file anything you want.
Say, you have to copy file1 to a different folder maybe to home directory how can we do that? well we can do that like this:

cp file /home/user/

I've used the absolute path here you can use whatever you like.
[Trick: ~ has a special meaning, it stands for logged in user's directory. You could have written previous command simply as
cp file1 ~/
and it would have done the same thing.]
Now you want to create a new directory in myfiles directory with the name backup and store all files of myfiles directory in the backup directory. Let's try it:

mkdir backup
cp file1 file2 file3 backup/

this command will copy file1 file2 file3 to backup directory.
We can copy multiple files using cp by specifying the directory to which files must be copied at the end.
We can also copy whole directory and all files and sub-directories in a directory using cp. In order to make a backup copy of myfiles directory and all of it's contents we will type:

cd ..                                           # navigate to previous directory
cp -r myfiles myfiles.bak       # recursively copy all contents of myfiles directory to myfiles.bak directory

This command will copy myfiles directory to myfiles.bak directory including all files and sub-directories

Command: mv
Syntax:       mv source1 [source2 ...] destination
Function:    mv stands for move. It is used for moving files from one place to another (cut/paste in GUI) and also for renaming the files.

If we want to rename our file1 to  file1.old in our myfiles folder we'll do the follow:

cd myfiles                                      # navigate first to myfiles folder
mv file1 file1.old

this command will rename the file1 to file1.old (it really has got so old now). Now say we want to create a new file1 file in our myfiles folder and move the file1.old file to our backup folder:

mv file1.old backup/                    # move (cut/paste) the file1.old file to backup directory
touch file1                                    # create a new file called file1
echo New file1 here > file1         # echo some content into file1

Command:  rmdir
Syntax: rmdir directory_name
Function: rmdir stands for remove directory. It is used for removing empty directories.

Let's create an empty directory in our myfiles directory called 'garbage' and then remove it using rmdir:

mkdir garbage
rmdir  garbage

Good practice keep it doing. (*_*)
But wait a second, I said empty directory! does it mean I cannot delete a directory which has contents in it (files and sub-directories) with rmdir? Yes!, you cannot do that with rmdir
So how am I gonna do that, well keep reading...

Command:  rm
Syntax:        rm FILE...
Function:     rm stands for remove. It is used to remove files and directories. Some of it's important flags are enlisted below.
Flags:          -r remove directories and their contents recursively
                     -f ignore nonexistent files and arguments, never prompt

Now let's say we want to delete the file file1.old in backup folder. Here is how we will do that:

rm backup/file1.old                # using relative path here

Boom! the file is gone. Keep in mind one thing when using rm "IT IS DESTRUCTIVE!". No I'm not yelling at you, I'm just warning you that when you use rm to delete a file it doesn't go to Trash (or Recycle Bin). Rather it is deleted and you cannot get it back (unless you use some special tools quickly). So don't try this at home. I'm just kidding but yes try it cautiously otherwise you are going to loose something important.

Did You said that we can delete directory as well with rm? Yes!, I did. You can delete a directory and all of it's contents with rm by just typing:

rm -r directory_name

Maybe we want to delete backup directory from our myfiles directory, just do this:

rm -r backup

And it is gone now.
Remember what I said about rm, use it with cautious and use rm -r more cautiously (believe me it costs a lot). -r flag will remove not just the files in directory it will also remove any sub-directories in that directory and there respective contents as well.

That is it for this article. I've said that I'll make each article short so that It can be learned quickly and remembered for longer time. I don't wanna bore you.
Related articles

Saturday, April 25, 2020

OVER $60 MILLION WORTH OF BITCOINS HACKED FROM NICEHASH EXCHANGE

Over $60 Million Worth of Bitcoins Hacked from NiceHash Exchange. Bitcoin mining platform and exchange NiceHash has been hacked, leaving investors short of close to $68 million in BTC.
As the price of Bitcoin continues to rocket, surging past the $14,500 mark at the time of writing, cyberattackers have once again begun hunting for a fresh target to cash in on in this lucrative industry.
Banks and financial institutions have long cautioned that the volatility of Bitcoin and other cryptocurrency makes it a risky investment, but for successful attackers, the industry potentially provides a quick method to get rich — much to the frustration of investors.
Unfortunately, it seems that one such criminal has gone down this path, compromising NiceHash servers and clearing the company out.
In a press release posted on Reddit, on Wednesday, NiceHash said that all operations will stop for the next 24 hours after their "payment system was compromised and the contents of the NiceHash Bitcoin wallet have been stolen."
NiceHash said it was working to "verify" the precise amount of BTC stolen, but according to a wallet which allegedly belongs to the attacker — traceable through the blockchain — 4,736.42 BTC was stolen, which at current pricing equates to $67,867,781.
"Clearly, this is a matter of deep concern and we are working hard to rectify the matter in the coming days," NiceHash says. "In addition to undertaking our own investigation, the incident has been reported to the relevant authorities and law enforcement and we are co-operating with them as a matter of urgency."
"We are fully committed to restoring the NiceHash service with the highest security measures at the earliest opportunity," the trading platform added.
The company has also asked users to change their online passwords as a precaution. NiceHash says the "full scope" of the incident is unknown.
"We are truly sorry for any inconvenience that this may have caused and are committing every resource towards solving this issue as soon as possible," the company added.
Inconvenience is an understatement — especially as so much was left in a single wallet — but the moment those coins shift, we may know more about the fate of the stolen investor funds.

More articles


  1. Blog Hacking
  2. Hacking Wikipedia
  3. Hacking Virus
  4. Hacking Wifi
  5. Hacker Etico
  6. Growth Hacking Madrid
  7. Kali Hacking
  8. Significado Hacker
  9. Hacking Online Games

Thursday, April 23, 2020

What Is Keylogger? Uses Of Keylogger In Hacking ?


What is keylogger? 

How does hacker use keylogger to hack social media account and steal important data for money extortion and many uses of keylogger ?

Types of keylogger? 

===================

Keylogger is a tool that hacker use to monitor and record the keystroke you made on your keyboard. Keylogger is the action of recording the keys struck on a keyboard and it has capability to record every keystroke made on that system as well as monitor screen recording also. This is the oldest forms of malware.


Sometimes it is called a keystroke logger or system monitor is a type of surveillance technology used to monitor and record each keystroke type a specific computer's keyboard. It is also available for use on smartphones such as Apple,I-phone and Android devices.


A keylogger can record instant messages,email and capture any information you type at any time using your keyboard,including usernames password of your social media ac and personal identifying pin etc thats the reason some hacker use it to hack social media account for money extortion.

======================

Use of keylogger are as follows- 

1-Employers to observe employee's computer activity. 

2-Attacker / Hacker used for hacking some crucial data of any organisation for money extortion.

3-Parental Control is use to supervise their chindren's internet usage and check to control the browsing history of their child.

4-Criminals use keylogger to steal personal or financial information such as banking details credit card details etc which they will sell and earn a goof profit. 

5-Spouse/Gf tracking-if you are facing this issue that your Spouse or Gf is cheating on you then you can install a keylogger on her cell phone to monitor her activities over the internet whatever you want such as check Whats app, facebook and cell phone texts messages etc . 

=====================

Basically there are two types of keylogger either the software or hardware but the most common types of keylogger across both these are as follows-

API based keylogger 

Form Grabbing Based Keylogger 

Kernal Based Keylogger 

Acoustic Keylogger ETC . 

====================

How to detect keylogger on a system?

An antikeylogger is a piece of software specially designed to detect it on a computer. 

Sometype of keylogger are easily detected and removed by the best antivirus software. 

You can view  the task manager(list of current programs) on a windows PC by Ctrl+Alt+Del to detect it.

Use of any software to perform any illegal activity is a crime, Do at your own risk.


Related links

Wednesday, April 22, 2020

Cracking Windows 8/8.1 Passwords With Mimikatz


You Might have read my previous posts about how to remove windows passwords using chntpw and might be thinking why am I writing another tutorial to do the same thing! Well today we are not going to remove the windows user password rather we are going to be more stealth in that we are not going to remove it rather we are going to know what is the users password and access his/her account with his/her own password. Sounds nice...


Requirements:


  1. A live bootable linux OS (I'm using Kali Linux)(Download Kali Linux)
  2. Mimikatz (Download | Blog)
  3. Physical Access to victim's machine
  4. A Working Brain in that Big Head (Download Here)


Steps:

1. First of all download mimikatz and put it in a pendrive.

2. Boat the victim's PC with your live bootable Pendrive (Kali Linux on pendrive in my case). And open a terminal window

3. Mount the Volume/Drive on which windows 8/8.1 is installed by typing these commands
in the terminal window:

mkdir /media/win
ntfs-3g /dev/sda1 /media/win

[NOTE] ntfs-3g is used to mount an NTFS drive in Read/Write mode otherwise you might not be able to write on the drive. Also /dev/sda1 is the name of the drive on which Windows OS is installed, to list your drives you can use lsblk -l or fdisk -l. The third flag is the location where the drive will be mounted.

4. Now navigate to the System32 folder using the following command

cd /media/win/Windows/System32

5. After navigating to the System32 rename the sethc.exe file to sethc.exe.bak by typing the following command:

mv sethc.exe sethc.exe.bak

sethc.exe is a windows program which runs automatically after shift-key is pressed more than 5 times continuously.

6. Now copy the cmd.exe program to sethc.exe replacing the original sethc.exe program using this command:

cp cmd.exe sethc.exe

[Note] We made a backup of sethc.exe program so that we can restore the original sethc.exe functionality

7. With this, we are done with the hard part of the hack now lets reboot the system and boot our Victim's Windows 8/8.1 OS.

8. After reaching the Windows Login Screen plugin the usb device with mimikatz on it and hit shift-key continuously five or more times. It will bring up a command prompt like this


9. Now navigate to your usb drive in my case its drive G:


10. Now navigate to the proper version of mimikatz binary folder (Win32 for32bit windows and x64 for 64 bit windows)


11. Run mimikatz and type the following commands one after the other in sequence:

privilege::debug
token::elevate
vault::list

the first command enables debug mode
the second one elevates the privilages
the last one lists the passwords which include picture password and pin (if set by the user)


That's it you got the password and everything else needed to log into the system. No more breaking and mess making its simple its easy and best of all its not Noisy lol...

Hope you enjoyed the tutorial have fun :)
Related posts
  1. Hacking Music
  2. Curso De Hacking
  3. Growth Hacking Instagram
  4. Curso De Hacking
  5. Hacking Meaning
  6. Sean Ellis Hacking Growth
  7. Growth Hacking Marketing
  8. Hacking For Dummies
  9. Hacking Ético Con Herramientas Python Pdf
  10. Software Hacking

BurpSuite Introduction & Installation


What is BurpSuite?
Burp Suite is a Java based Web Penetration Testing framework. It has become an industry standard suite of tools used by information security professionals. Burp Suite helps you identify vulnerabilities and verify attack vectors that are affecting web applications. Because of its popularity and breadth as well as depth of features, we have created this useful page as a collection of Burp Suite knowledge and information.

In its simplest form, Burp Suite can be classified as an Interception Proxy. While browsing their target application, a penetration tester can configure their internet browser to route traffic through the Burp Suite proxy server. Burp Suite then acts as a (sort of) Man In The Middle by capturing and analyzing each request to and from the target web application so that they can be analyzed.


Everyone has their favorite security tools, but when it comes to mobile and web applications I've always found myself looking BurpSuite . It always seems to have everything I need and for folks just getting started with web application testing it can be a challenge putting all of the pieces together. I'm just going to go through the installation to paint a good picture of how to get it up quickly.

BurpSuite is freely available with everything you need to get started and when you're ready to cut the leash, the professional version has some handy tools that can make the whole process a little bit easier. I'll also go through how to install FoxyProxy which makes it much easier to change your proxy setup, but we'll get into that a little later.

Requirements and assumptions:

Mozilla Firefox 3.1 or Later Knowledge of Firefox Add-ons and installation The Java Runtime Environment installed

Download BurpSuite from http://portswigger.net/burp/download.htmland make a note of where you save it.

on for Firefox from   https://addons.mozilla.org/en-US/firefox/addon/foxyproxy-standard/


If this is your first time running the JAR file, it may take a minute or two to load, so be patient and wait.


Video for setup and installation.


You need to install compatible version of java , So that you can run BurpSuite.
More information

  1. Hacker Blanco
  2. Hacking Movies
  3. Quiero Ser Hacker
  4. Seguridad Y Hacking
  5. Hacking With Python
  6. Hacking Definicion
  7. Hacking Simulator

Pcap Of Wannacry Spreading Using EthernalBlue

Saw that a lot of people were looking for a pcap with WannaCry spreading Using EthernalBlue.

I have put together a little "petri dish" test environment and started looking for a sample that has the exploit. Some samples out there simply do not have the exploit code, and even tough they will encrypt the files locally, sometimes the mounted shares too, they would not spread.

Luckily, I have found this nice blog post from McAfee Labs: https://securingtomorrow.mcafee.com/mcafee-labs/analysis-wannacry-ransomware/ with the reference to the sample SHA256: 24d004a104d4d54034dbcffc2a4b19a11f39008a575aa614ea04703480b1022c (they keep referring to samples with MD5, which is still a very-very bad practice, but the hash is MD5: DB349B97C37D22F5EA1D1841E3C89EB4)

Once I got the sample from the VxStream Sandbox site, dropped it in the test environment, and monitored it with Security Onion. I was super happy to see it spreading, despite the fact that for the first run my Windows 7 x64 VM went to BSOD as the EthernalBlue exploit failed.

But the second run was a full success, all my Windows 7 VMs got infected. Brad was so kind and made a guest blog post at one of my favorite sites, www.malware-traffic-analysis.net so you can find the pcap, description of the test environment and some screenshots here: http://malware-traffic-analysis.net/2017/05/18/index2.htmlRelated links

What Is A Vpn And How Is It Works ?

What Is A VPN?

VPN stands for Virtual Private Network, and maybe you have heard or read that term in association with privacy and geolocation. In this article we will learn and look into what exactly is it how does it work and what can it do for you.

How Does A VPN Work?

Let me explain it now but before we dive into VPNs, let me tell you a little bit about how the internet works now. At home, you have probably got some router or modem from your telephone company or your internet service provider. Then that is connected to your desktop, maybe by an Ethernet cable, to your smartphone over Wi-Fi, perhaps to your laptop over Wi-Fi and so on.

Inside your house when you do a laptop talk or your PC talk or your phone talk that is part of your private network, and that does not go out onto the internet. It stays inside your house, but the moment you open a web page somewhere out on the internet that data flows through your modem down into your local phone company or ISP and then out across the internet.

It will travel across the internet until it gets to the server the server will then reply with some information that will come back through the internet into your local telecommunications provider or ISP down through to your modem and then back onto your PC or your Android smartphone.

Now, while all that data is rushing around the internet, it needs to know where it is going and the things to know where they are going. They need an address it is the same with the postal service is the same when you want to go and visit somebody. It is the same with data on the internet.

There are different layers of addressing or different types of addressing that go on, but at the highest level, each of these packets of information has what is called an IP address. The IP address is you have probably seen them there those four digits from 0 to 255 with dots in between them so maybe like 178.304.67.

The modem or your router has probably been assigned an IP address from your ISP and what happens in is that when your data goes through the internet every piece of equipment, it touches every router every server it touches knows that your IP address. It is done that is not because they are trying to spy on you but because trying to connect collect data about the number of people that clicked into their website.

What a VPN does is it allows you to create a tunnel a connection from your home computer to a server somewhere else in the world. The connection is encrypted, and then when I access something on the Internet, it goes through that tunnel and then it arrived at that other server and then it goes on to the Internet, and it will finally arrive at the web server or the service. Your IP address will no longer be your IP address. The IP address of the VPN server protects your IP.

If you use a VPN, first of all, your local telecommunications provider and your local government have no idea about the sites that you are accessing. When you go through the VPN, it is all encrypted. VPN allows you to connect to another server in another country.


@£√£RYTHING NT
Related links


Tuesday, April 21, 2020

Wafw00F: The Web Application Firewall Fingerprinting Tool

How does wafw00f work?
   To do its magic, WAFW00F does the following steps:
  • Sends a normal HTTP request and analyses the response; this identifies a number of WAF solutions.
  • If that is not successful, wafw00f sends a number of (potentially malicious) HTTP requests and uses simple logic to deduce which WAF it is.
  • If that is also not successful, wafw00f analyses the responses previously returned and uses another simple algorithm to guess if a WAF or security solution is actively responding to wafw00f's attacks.

   For further details, check out the source code on EnableSecurity's main repository.

What does it detect? WAFW00F can detect a number of firewalls, a list of which is as below:

wafw00f's installation
   If you're using Debian-based distro, enter this commands to install wafw00f: sudo apt update && sudo apt install wafw00f

   But if you're using another Linux distro, enter these commands to install wafw00f:

How to use wafw00f?
   The basic usage is to pass an URL as an argument. Example:

Final Words to you
   Questions? Pull up an issue on GitHub Issue Tracker or contact to EnableSecurity.
   Pull requests, ideas and issues are highly welcome. If you wish to see how WAFW00F is being developed, check out the development board.

   Some useful links:

   Presently being developed and maintained by:

Related articles


Monday, April 20, 2020

Why SaaS Opens The Door To So Many Cyber Threats (And How To Make It Safer)

Cloud services have become increasingly important to many companies' daily operations, and the rapid adoption of web apps has allowed businesses to continue operating with limited productivity hiccups, even as global coronavirus restrictions have forced much of the world to work from home. But at the same time, even major corporations have fallen prey to hackers. How can you maintain the

via The Hacker News

Related news